Making 3D Shapes and Similar Objects using Scale Drawing
/
Creating 3 Dimensional Drawings
One of my favorite activities each year is using scale factor to create three dimensional drawings. We do this activity when we are studying Unit Rates. There are a variety of reasons why this is one of my go to lessons.
Hands On
This activity gives students the chance to create something. The act of drawing, measuring, & designing is a nice change of pace from the usual worksheet avalanche. The actual act of creating this object allows students to see the relationship of sides all changing proportionally.
Creativity
This lesson gives students the opportunity to showcase their creative/artistic side. We have some basic guidelines, but in general students are free to design what appeals to them.
Visual
Many students are visual learners. For some students it easy to see difference between an object drawn to scale and an object that does not have a constant proportionality.
Connections with other classes
Art, Social studies (maps), industrial tech, and computer science classes are some of the classes that we are able to show a connection with. For example, our art classes use one point perspective drawings which share a ton of similarities with our scale drawings.
Differentiate
The activity allows you to increase (or decrease) the difficulty. For example, if you have a student that is struggling you can use a very simple shape such as the letter "L" or use a very easy scale factor such as 2. If you want to increase the intensity you can have students measure everything in inches (not centimeters) or require a very unusual scale factor such as 3/8 or 1.75.
THE PROCESS
The Build Up
One of the first things we do is to talk about Scale Factor. We want the students to understand that when we are enlarging (or shrinking) an object all the edges of this object are increasing (or decreasing) at a constant rate (proportion). We do this by having a worksheet with similar objects and their measurements. Students will then find the rate of increase or decrease (Scale Factors less than one = smaller, greater than one = larger).
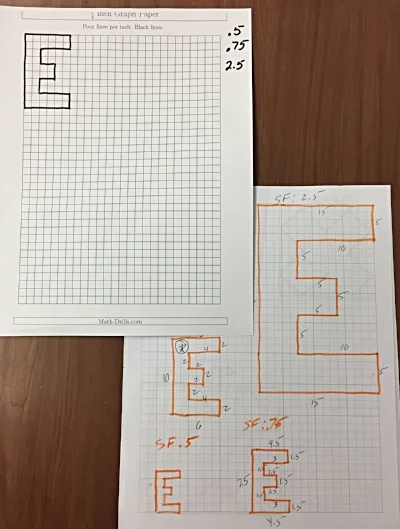
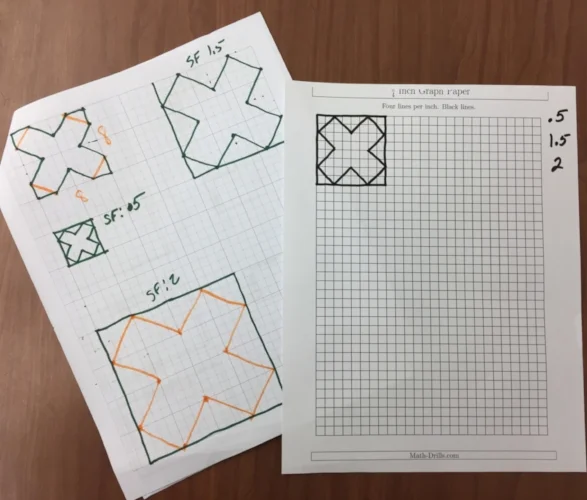
Next, we give the students a grid paper with a shape on it. We first start with a basic rectangle then move on to more complex shapes. Above are two of the sheets we used this year. We give the students a few different Scale Factors we would like them to use to create a similar object. You can see on the "E" paper on the left we used Scale Factors of 0.5, 0.75 & 2.5.
Usually after doing a few of these the students begin to understand how all the edges are increasing at the same rate.
Model the Process
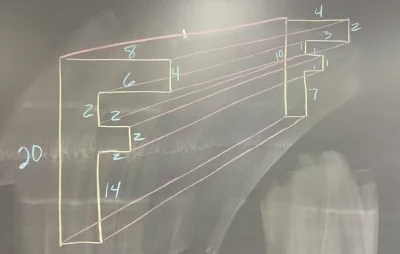
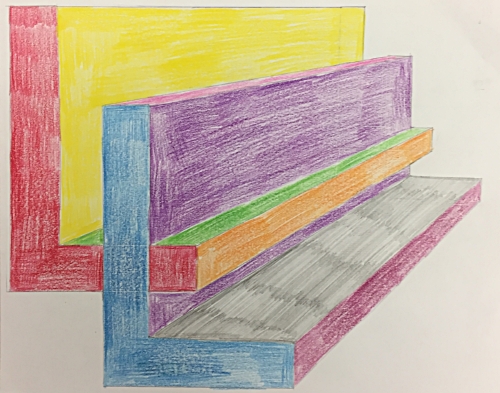
The first thing I like to do is to show them an example. I start by drawing a random object. In the example above (left) I used the letter "F." I like to use a letter with a lot of edges because it helps to show how all the different edges shrink (or enlarge) at a constant rate.
After I draw the original "F" I then draw a second letter "F" and connect all the corners. I like to have the students connect ALL the corners, even the ones that will be covered once we color. I have to students lightly draw their lines, but I like to see the lines after they have been colored over.
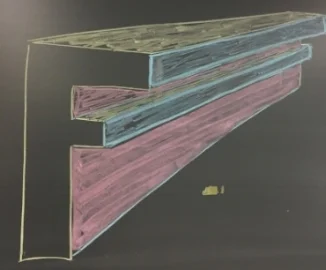
Next, I color in the different sides that would be visible. This is a real struggle for students to visualize. I try to color code my example to help the students to better visualize. In the example above right I use yellow for the tops, pink for the right side of the stem and blue for the right sides that stick out. (I realize this is not technical talk). The result is an object that has a three dimensional look.
Experiment with something Easy
I like the students to start with a very simple shape, such as a rectangle, to get a feel for the process. One of the most common mistakes is for a student to get in over their head on their very first object. After getting some experience with a simple shape it is time to move on to a more complicated shape.
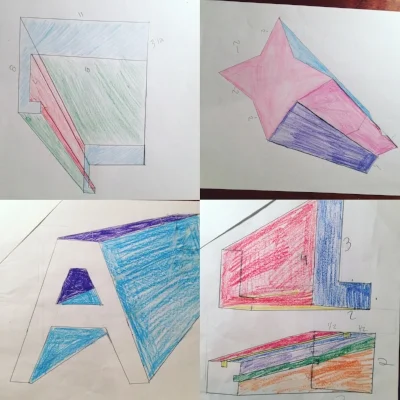
Making your 3D object

Once we feel like the students understand what we are trying to do we turn them loose.
Students select a shape that they like. (We have students stay away from rounded edges until we feel like they totally grasp the concept). The students will draw the original object and then a second similar object. We usually let the student pick their own scale factor (almost always 2 or 1/2), but at times we will select a scale factor when we want to challenge the students.
Once students have drawn these two similar shapes they connect the corresponding corners.
* As a side note: where you place the second similar object will change to look of your 3D object. This is a good thing to experiment with a basic shape.
Once the two shapes have been connected it is time to color. This is a great way to determine if students can visualize what sides can be seen and which ones are blocked or partially blocked. When coloring, it is helpful to use different colors to help each side stand out. Another thing to help the shape to really stand out is you trace over the visible edges with a pencil but to push down very hard to make darker lines.
Drawing a similar object using a scale factor
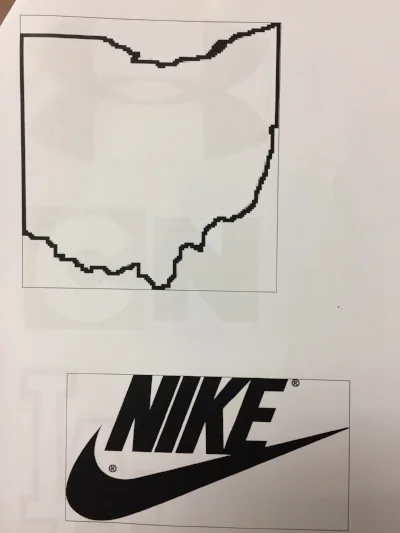
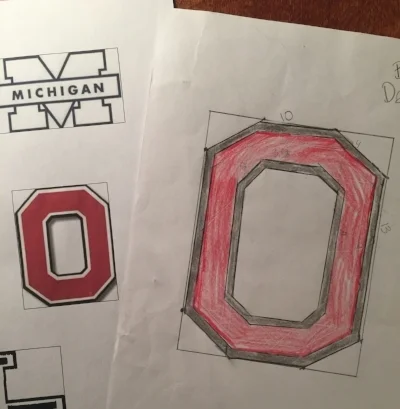
Another thing I like to do with scale factor is to have students draw an object to scale. We give students a packet of different shapes that they can select from. We have a collection of basic and challenging shapes to select from. One key thing we do to help the students is to to draw rectangles around the objects. Why? This gives the students something to help guide them.
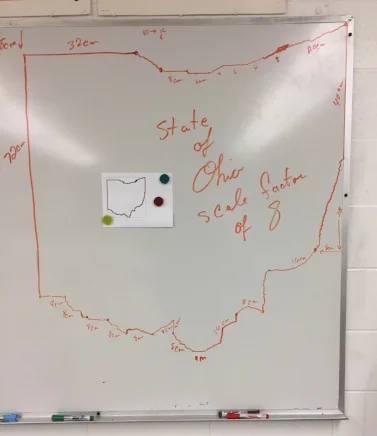
In the example below, on the left we have a copy of the state of Ohio. Is my scale drawing of the picture of Ohio. On the original paper copy on the left the upper left corner is 1 cm below the corner of the rectangle. When I did the scale drawing of Ohio I used a scale factor of 8. As a result, I measured down 8 cm from the upper left corner of my rectangle.
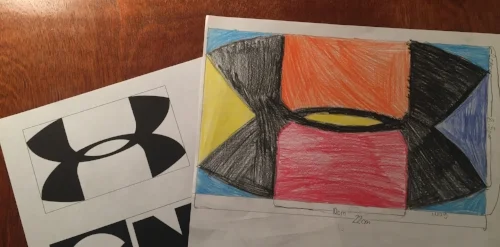
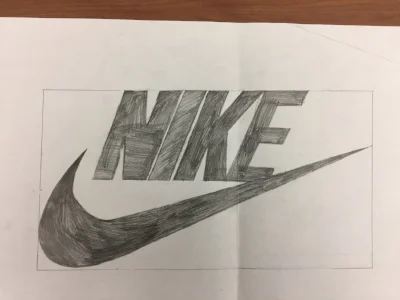
Below are a couple of examples of students drawing similar objects using a scale factor.
Todd Hawk is a middle school math teacher and the Founder of the Land of Math LLC (www.landofmath.com). You can reach him at landofmath2@gmail.com or follow him on twitter: @landofmath2 and Instagram: @landofmath