Cereal Box Project: A middle school math project (Copy)

For over a decade the Cereal Box Project has  been a staple in our classroom. The idea is that a cereal box company is introducing a new cereal and they want a unique design for the cereal box to help gain extra attention.

Because the company wants something creative, a simple rectangular prism simply just won't do. The goal is for students to find ways to combine different shapes together to create this eye catching cereal box.

The following is a basic outline of the steps that we follow with this project. In addition, I'm including a few lessons from this years Cereal Box Project experience. 

Step 1 - Come up with an Idea

The idea? A light bulb of course. How do you make a light bulb? Make a Hendecagon of naturally.

Like baseball? Really into Star Wars? Love doughnuts?

When coming up with an idea I find it helps student engagement when the students can use a topic that they are interested in. For example, if a student is really into baseball/softball they can make their cereal box look like a glove, bat, baseball field, home plate etc. This year a lot of my students are into the video game Fortnite. As a result, a large amount of cereal boxes has a strong Fortnite theme.


Step 2 - Reverse Engineer

As a middle school or elementary student there are certain limitations that we must work around. Many of these limitations are related to curves. For example, If you are trying to make a basketball (sphere), Football (prolate spheroid), or perhaps a megaphone (truncated cone) you are going to dive into a lot of math that is above middle school math level. 

Have the students think about what they want to create and how they can arrange different shapes to make this object. For me, the fun and challenging part of the project is to create these difficult shapes by using the students current knowledge and skills. 

Step 3 - Sketch out the idea

Put it down on paper. Draw the different shapes you are going to combine together to create your shape. Include dimensions.

Step 4 - Build a Prototype

I have our students build their prototype the same size as their actual project. We use scrap paper and masking tape to build these prototypes. A lot of potential pitfalls can be avoided during this step. 

Step 5 - Cutting out individual Pieces

When you begin to build your actual Cereal Box the first thing I like for students to do is cut out the individual sides. We build our cereal boxes out of card stock which is a real thick paper similar to poster board. The thicker paper is nice because it is more stable.


Step 6 - Decorate the individual Pieces

Before the students begin to assemble their projects they should first decorate.  Every year I will have a small collection of students that will tape their entire box together then decide to color and design it.  This almost always leads to frustration and crushed cereal boxes.

Step 7 - Assemble the Cereal Box

We use scotch tape on the final project. We try to tape as much on the inside as possible. As a general rule: The less tape you see the better the project will look.

Step 8 - Complete the required paperwork

We usually have students calculate the surface area and volume of their projects. In addition we also have students draw (to scale) Nets and 3D designs of the project. 

Lessons Learned from this years Cereal Box Projects

We had another successful year with our cereal box project. Many of the projects were creative and well done. Most of the students were fully engaged in the project. But we did have a couple areas that I need to clean up before next year.

The Curse of the Circle

We had a few students this year build cereal boxes that were either cylinders or had a circle as part of the design.  In both of these cases many students just randomly made a circle and just wrapped a long stretch of paper around the circle. There was no thought given to diameter, radius, or circumference. Needless to say, this made for a mess when it came time to make the cereal box the same as its prototype and with calculating surface area and volume.  

Struggles with Scissors and Straight lines

Normally I will take a day (or two) to show the students a few tips/tricks when making and cutting out the sides of their project.  Because of a time crunch this year, I thought I could save a little time and just give a brief talk and turn them lose. In the end this just created a lot more work for me and made it harder to help out as many students.


Interested in giving the Cereal Box Project a try?

This book will give you an in depth guide to how I use this project in my class.


How to Maximize Starbucks new Reward System

The Math behind getting the most from your Starbucks Rewards Program

Hellooooooo, free coffee.

More drinks. More fun. More free stuff.


starbucks logo.jpg
 

Is the third time the Charm?

For the third time in recent memory, Starbucks has wheeled out a new rewards program. The original program rewarded you for each visit/transaction. The problem was not all visits were equal. For example, Aunt Alice might buy a tall coffee and get the same number of stars as Steve that just ordered 7 caramel frappuccinos for the office. This led to an even bigger problem: people splitting their orders into multiple orders. For example, Steve would take his 7 frappuccinos and tell the barista that he would like 7 separate transactions so that he could get 7 times the number of stars. Needless to say, the average wait time in line began to increase.

That led to the most recent reward system in which everyone received 2 stars for every dollar spent. This eliminated the need for people to split their orders and allowed for lines to move quicker. This second reward system really benefited people that spent more money buying hand crafted drinks like frappuccinos and macchiatos and was a bit of a disadvantage for the person that just ordered a basic tall coffee. With this reward system everyone received a free drink when they received 125 stars. Like most people, this was my chance to load up on a larger, more expensive drink . I usually opted for a Trenta Pink Drink (YUM!). Normally I would never order this drink, but it was free and I wanted to get the maximum that I could from my freebie.

Like your frappuccino? It now takes 25 more stars (was 125 - now 150) to get a free Frappuccino!

Like your frappuccino? It now takes 25 more stars (was 125 - now 150) to get a free Frappuccino!


STARBUCKS NEWEST REWARD PROGRAM

First off, before we look at how this latest version of the rewards system works, I just went to spend a second to talk about Starbuck’s signage and brochures for this new program. They are using the tagline “Hellooooooo, free coffee” as if this is a new concept. If you have never been to Starbucks before I guess this speaks to you, but for over 98% (totally make up number on my part) of us we are already getting free coffee. Thanks for letting me get this out of my system. I feel much better now. Let’s continue to break down the new Reward System.

The most recent program allowed you to get a free drink every 125 stars. This newest Starbucks Rewards Program gives you levels staring with 25 Stars and progressing up to 400 Stars. Here is a brief summary of the different things you get at each level

25 Stars - Customize your Drink (up to $1)

50 Stars earns you a free coffee

50 Stars earns you a free coffee

  • Basically, you can add different things to you drinks like espresso or syrup for free

50 Stars - Hot Coffee, Hot Tea or Bakery Items

  • At this level you can get yourself a free HOT coffee or tea. You can also get a free bakery item like a muffin or bagel.

150 Stars - Hand crafted drink, hot breakfast, or parfait

  • This is the level to achieve if you want a free frappuccino or macchiato. This is also where you need to be if you want a free breakfast sandwich (ex. bacon gouda) or some oatmeal.

200 Stars - Lunch Sandwich, Protein Box, or Salad

  • Now you are able to get free food items such as the Ham & Swiss Panini, Chicken Wrap, or the Chicken & Quinoa Protein Bowl

400 Stars - Merchandise (up to $20) or at home coffee

  • Cups, mugs, bags of coffee are all in play at this level


How to get the most from your Starbucks Rewards


First off, is the new Starbucks Reward Program better? The answer is: it really depends on what you get. The previous program everyone got a free item at 125 Stars so most of us would get our fancy hand crafted beverage or a tasty sandwich to max our free item. With this new reward system, Starbucks is giving us options.

1200 Stars

To make it easy to compare our different options I’m going to base everything off of 1,200 Stars. To achieve 1200 Stars you need to spend $50 a month for a year. Some of you might spend this in a week. But why 1200? I’m using this number because each of the Star Levels (25, 50, 150, 200, and 400) will divide into evenly. In the world of math, the 1,200 is the Least Common Multiple of these five numbers.

Let’s look at what you can get at each level for 1,200 Stars.

If you are just nuts about customizing your drinks you can use 25 stars to jazz up your drinks (up to $1). 25 will divide into 1200 a total of 48 times. So this means with 1200 Stars you could customize you drinks 48 times. The total value of this would be $48 if you maximized it.

150 Stars gets you a Bacon Gouda

150 Stars gets you a Bacon Gouda

By cashing in 50 Stars at a time you would get 24 free items. This would include things such as coffee, muffin, or a croissant. A venti coffee cost $2.45 which means you would get $58.80 worth of free product. A muffin is $2.95 each or a total of $70.80 of free product. The almond croissant is valued at $3.45 each or a total of $78.

At 150 Stars you would get 8 free items with 1200 stars. This includes hand crafted drinks (such as frappuccinos) and breakfast sandwiches. The most expensive item at my local Starbucks is the Caramel Mocha Frapprccino which cost $5.25. This would equal $42 in free product.

200 Stars will get you a total of 6 free items such as a Lunch Sandwich, Protein Box or a Salad. The most expensive of these items is the Chicken Wrap at $8.15 which would be a total of $48.90 of free product.

Finally, at the 400 Stars you would get 3 free items which you could use on bags of coffee or merchandise (up to $20). A bag of coffee cost around $14 so this would be a total of $42 worth of free product. You could get up to $60 worth of merchandise such as cups, mugs, tumblers, etc.


The Verdict

Looking for an excuse to eat more Muffins? If you want to maximize you Starbucks rewards make sure you eat plenty of these delicious treats!

Looking for an excuse to eat more Muffins? If you want to maximize you Starbucks rewards make sure you eat plenty of these delicious treats!

So what is the best thing to do? Glad you asked.

If you like hot coffee, muffins, bagels and croissants then the 50 Stars is the place for you. With the old system the mindset was that we earned this free item so we wanted to go a bit nuts and get an expensive item. With the new tiered system you are actually further ahead to use 50 Stars to get these items and splurge and buy the hand crafted drinks like the Caramel Mocha Frappuccino.

Another way to think of it: With 150 stars you could get one Caramel Mocha Frappuccino for $5.25 or you could get three muffins at $2.95 each for a total value of $8.85. For every 1,200 STARS, you would get an extra $36 in product by getting bakery items.

A basic venti coffee earns you and extra $16 in product over course of the 1,200 STARS.

Another good option is to spend it on merchandise. Many items at Starbucks are right around the $20 price point. If you enjoy having Starbucks swag or you buy gifts for people that love Starbucks this could be a great option. The nice thing about getting product is that you have something you can keep.

What is the worst thing you can do?

Using your stars to get a hand crafted drink or customizing your drinks gives you the least amount of value.

When you look at the new Starbucks Reward System, it’s clear they are hammering the handcraft beverage crowd (the 150 Star Level). First, to get a hand crafted drink now takes an additional 25 stars (a 20% increase) when compared to the old program. Second, the value you get is far less compared to the other levels. It’s almost as if Starbucks understands that most people are going to use their stars on frappuccinos and lattes and they skew the program to penalize the people that love these products.

The feeling of getting a free coffee or bagel is not as exciting as getting a free Caramel Macchiato but in the long run you are getting the most value hanging out in the 50 STAR World.

Now go get yourself a venti coffee and a blueberry muffin… you earned it.


Integers: Adding and Subtracting with toy Army Soldiers.

Watch the video of Green vs. Tan Soldiers in this struggle to help you understand how to add and subtract integers.


In the land of math, one of the greatest challenges is understanding how to add and subtract integers (positive and negative numbers). Anytime you are engaged in an epic struggle it’s always a good thing to bring in reinforcements. Battling Integers is no exception.

To help us tip the odds in our favor we have brought in a group of elite mathematical warriors. The heros we are speaking of are the legendary toy army soldiers. These bitter rivals (tan and green soldiers) have united with the common goal of leading us to victory in the struggle with adding and subtracting integers.

The Rivals: Green (positive) vs. Tan (Negative)

Green Soldiers each = +1

Green Soldiers each = +1

Tan soldiers each = -1

Tan soldiers each = -1

Anytime you add two opposite numbers you always get zero.

Anytime you add two opposite numbers you always get zero.

In this conflict the Green army soldiers will represent positives and the Tan army soldiers will represent negatives. A critical concept to understand is that if you add a positive one and a negative one together you get zero. Any time you add opposites you will always get zero.

For example, a +7 + -7 = 0 and +29 + -29 = 0.


Operation Addition

Positive + Positive = Positive

This first situation is by far the easiest. This is what we were taught back in elementary school. Back in elementary school your teacher probably didn’t refer to the numbers you were adding as positives, but they were. So, 2 + 1 = 3 is really a +2 + +1 = +3.

Two Pieces of trivia to help you:

1) Many times numbers will be put into parenthesis. So, +2 + +1 = +3 might be written as (+2) + (+1) = (+3).

2) If a number doesn’t have a sign (example: 8 + 2 = 10) it is understood that the number is a positive. So in this example, the 8, 2, and 10 are all positives because there is no sign.

If we are adding two positive numbers I like to think of this as green soldiers (the positives) are getting reinforcements. For example, if we start with 5 green army soldiers (+5) and three more green soldiers (+3) join them we now have a total of 8 green (+8) soldiers. When you add a Positive + Positive you will always get a Positive answer.

We start with 5 green soldiers which represents a +5

We start with 5 green soldiers which represents a +5

3 more green soldiers (+3) are added to the battle.

3 more green soldiers (+3) are added to the battle.

The result: A positive 8 soldiers

The result: A positive 8 soldiers

Negative + Negative = Negative

This is very similar to the previous example.

If we are adding two negative numbers I like to think of this as the tan soldiers (the negatives) are getting reinforcements. For example, if we start with 4 tan army soldiers (-4) and three more tan soldiers (-3) join them we now have a total of 7 tan (-7) soldiers. When you add a Negative + a Negative you will always get a Negative answer.

We start out with 4 tan soldiers which represents a negative 4

We start out with 4 tan soldiers which represents a negative 4

3 more tan soldiers (-3)are added to the mix

3 more tan soldiers (-3)are added to the mix

We now have 7 tan soldiers (-7)

We now have 7 tan soldiers (-7)

Adding Positive and Negative

When you are adding a positive and a negative things get a bit more challenging. When you are adding different signs you can get either a positive or a negative answer. This is where the Army soldiers really help us to model this.

Two questions to ask yourself when adding a positive (green soldiers) and a negative (tan soldiers).

  1. Which side has the advantage? In other words, which side has the most soldiers? The side that has the most soldiers will be the sign of the answer. For example, if you have more tan soldiers you will have a negative answer.

  2. How many more soldiers does the one side have over the other? This difference is the number that will go with the sign.

Positive + Negative = Positive

In our first battle we have 3 green soldiers (+3) and 2 tan soldiers (-2). In this fight the green soldiers (the positives) have the advantage. So this means the answer to this problem will be a positive answer. Next, we look at the advantage the green soldiers have in this battle which is a 1 soldier advantage. As a result, the answer to (+3) + (-2) = (+1).

The 2 tan soldiers and 2 of the green soldiers when combined equal zero. The only thing that is left standing is the lone green soldier.

We start with 3 green soldiers (+3)

We start with 3 green soldiers (+3)

2 Tan soldiers (-2) are then added to the fight

2 Tan soldiers (-2) are then added to the fight

The result of adding to Tan soldiers (-2) to 3 green soldiers (+3) is a 1 soldier advantage for the green (+1).

The result of adding to Tan soldiers (-2) to 3 green soldiers (+3) is a 1 soldier advantage for the green (+1).

Other examples:

(+8) + (-2) = (+6)

(+31) + (-15) = (+16)

Positive + Negative = Negative

In out next clash, we have 2 green soldiers (+2) and 6 tan soldiers (-6). In this battle the tan soldiers have the advantage, so we know the answer is going to be a negative because we have more tan soldiers. When we compare the two sides, the tan soldiers (negatives) have the advantage by 4 soldiers. So we know the answer is going to be: -4. So, (+2) + (-6) = (-4).

The 2 green soldiers and 2 of the tan soldiers cancel each other out (equal zero). All we are left with is the 4 tan soldiers.

We start with 2 Green soldiers (+2)

We start with 2 Green soldiers (+2)

We add 6 tan soldiers (-6) to the battle

We add 6 tan soldiers (-6) to the battle

the result of adding the 6 tan soldiers (-6) to the 2 green soldiers (+2) is an advantage for 4 more tan soldiers (-4)

the result of adding the 6 tan soldiers (-6) to the 2 green soldiers (+2) is an advantage for 4 more tan soldiers (-4)

Other examples:

(+4) + (-9) = (-5)

(-34) + (+25) = (-9)

RULES FOR ADDITION

  1. When adding two numbers with the same sign

    1. Keep the sign

    2. Add the numbers

  2. When adding two numbers with different signs

    1. Use the sign that you have the most of

    2. Find the difference in the amount of Positives and Negatives

    3. Combine the sign with the difference for your answer

Rules for adding a Positive and Negative that a Mathematician could live with

2. When adding two numbers with different signs

1. Take the sign of the larger Absolute Value

2. Find the difference in the Absolute Values

3. Combine the sign of the larger Absolute Value with the difference in the two Absolute Values

finding the sign of the largest absolute Value

finding the sign of the largest absolute Value

finding difference in absolute values & combining with the sign

finding difference in absolute values & combining with the sign

Operation Subtraction

To successfully model subtracting integers it is important to remember the rules for addition. If students don’t have a solid grasp of the rules of adding integers your just wasting your time.

Positive - Positive = Positive

This first example of subtracting integers will be the easiest. This is what your teachers taught you in elementary school.

Let’s say we have a group of 5 Green soldiers (+5) and you take away 2 of these Green soldiers (+2). (Perhaps they were redeployed to a different area with more fighting.) The result of having 5 Green soldiers ((+5) and taking away 2 green soldiers (+2) is that 3 green soldiers remain (+3). So (+5) - (+2) = (+3).

We start with 5 green soldiers (+5)

We start with 5 green soldiers (+5)

2 of the green soldiers are removed

2 of the green soldiers are removed

The result is only 3 green soldiers (+3) remain

The result is only 3 green soldiers (+3) remain

Positive - Positive = Negative

Sometimes when you subtract two positives you get a negative answer. A LOT of kids struggle with this. This is were understanding the rules for addition are critical.

To model this problem we can imagine a battlefield in which we have 6 Green soldiers (+6) and 4 Tan soldiers (-4) locked in combat. At this moment on the battlefield the Green soldiers have a 2 soldier advantage (+2). This battle scene that we are starting with equals a Positive 2 (+2).

For some reason three of the green soldiers leave (captured? Transferred to fight elsewhere?). So, we started this battle with a 2 soldier advantage (+2) for the Green soldiers. 3 of the Green solders (+3) are taken away. This now leaves 3 Green soldiers (+3) and 4 Tan soldiers to battle it out. The result of these 3 Green soldiers leaving it that Tan soldiers now have a 1 soldier advantage (-1). So (+2) - (+3) = (-1).

In this initial battle the green soldiers have a 2 soldier advantage (+2)

In this initial battle the green soldiers have a 2 soldier advantage (+2)

three of the green solders (+3) leave

three of the green solders (+3) leave

The result of taking away 3 green soldiers (+3) from a situation where the green had a 2 soldier (+2) advantage is that the tan now has a 1 soldier advantage (-1)

The result of taking away 3 green soldiers (+3) from a situation where the green had a 2 soldier (+2) advantage is that the tan now has a 1 soldier advantage (-1)

IMPORTANT THING TO NOTICE!

In the above battle, three Green soldiers (+3) are taken away to give the Tan soldiers a 1 soldier advantage (-1). But, what if the Green soldiers didn’t leave? What could we do to give the Tan soldiers the advantage by One? We could have given the Tan soldiers 3 more men (-3).

So a key thing to notice:

  • Taking away 3 Green soldiers (subtracting a positive 3) has the same result as adding 3 Tan soldiers (adding a negative 3). In both cases you get a one soldier advantage for the Tan army (-1).

Other examples:

(+5) - (+9) = (-4) is the same as (+5) + (-9) = (-4)

(+3) - (+5) = (-2) is the same as (+3) + (-5) = (-2)

Positive - Negative = Positive

In our next conflict, we have a total of 6 Green soldiers and 4 Tan soldiers doing battle. That would equal a positive 2 (+2) or a two soldier advantage for the Green at the start of this battle.

So we are starting with a 2 soldier advantage for the Green (+2). For some unexplained reason three of the Tan soldiers leave (probably retreating). As a result, the Green soldiers now have the advantage by 5 soldiers (6 Green vs. 1 Tan). So, (+2) - (-3) = (+5).

ANY TIME YOU SUBTRACT A NEGATIVE YOUR ANSWER WILL GET LARGER

(Any time you get rid of a negative in your life (expenses for example) your life gets better)

In this initial battle the green have a 2 soldier advantage (+2)

In this initial battle the green have a 2 soldier advantage (+2)

Next, three of the tan soldiers (-3) are taken away

Next, three of the tan soldiers (-3) are taken away

The result of taking away 3 tan soldiers (-3) is that the green soldiers now have a 5 soldier (+5) advantage

The result of taking away 3 tan soldiers (-3) is that the green soldiers now have a 5 soldier (+5) advantage

IMPORTANT THING TO NOTICE!

In the above battle, three Tan soldiers (-3) are taken away to give the Green soldiers a 5 soldier advantage (+5). But, what if the Tan soldiers stayed? What could we do to give the Green soldiers the advantage by 5? We could have given the Green soldiers 3 more men (+3).

So a key thing to notice:

  • Taking away 3 Tan soldiers (subtracting a negative 3) has the same result as adding 3 Green soldiers (adding a positive 3). In both cases you get a five soldier advantage for the Green army (+5).

Other examples:

(+9) - (-5) = (+14) is the same as (+9) + (+5) = (+14)

(+13) - (-7) = (+20) is the same as (+13) + (+7) = (+20)

Negative - Negative = Negative

In our next clash of Green soldiers vs. Tan soldiers we have 2 Green and 5 Tan soldiers. So at the start of this fight, the Tan soldiers have the advantage by 3 soldiers (-3). As the battle rages, 2 of the tan soldiers (-2) leave to go fight somewhere else. Now the advantage the Tan soldiers have has been reduced to just a one soldier advantage (-1). So (-3) - (-2) = (-1).

We start with this battle where the tan soldiers have the advantage by 3 soldiers (-3)

We start with this battle where the tan soldiers have the advantage by 3 soldiers (-3)

two of the tan soldiers leave (-2)

two of the tan soldiers leave (-2)

The result of taking away two tan (-2) soldiers is an advantage for the tan soldiers of just 1 (-1)

The result of taking away two tan (-2) soldiers is an advantage for the tan soldiers of just 1 (-1)

IMPORTANT THING TO NOTICE!

In the above battle, two Tan soldiers (-2) are taken away resulting in just a 1 soldier advantage. But, what if the Tan soldiers never left? We could create the same outcome by reinforcing the Green soldiers with two more soldiers (+2).

So a key thing to notice:

  • Taking away 2 Tan soldiers (subtracting a negative 2) has the same result as adding 2 Green soldiers (adding a positive 2). In both cases you get a one soldier advantage for the Tan army (-1).

Other examples:

(-4) - (-2) = (-2) is the same as (-4) + (+2) = (-2)

(-20) - (-5) = (-15) is the same as (-20) + (+5) = (-15)


Negative - Negative = Positive

This is another situation that students really struggle to understand.

In this skirmish there are 4 Green soldiers (+4) and 5 Tan soldiers (-5) engaged in an epic conflict. At the start of this fight the Tan soldiers have a 1 soldier advantage (-1). In the middle of the fight 3 of the tan soldiers (-3) leave (why? I’m not really sure but I’m sure they had a good reason). When this happens the the Green soldiers now have an advantage by 2 soldiers (+2). So (-1) - (-3) = (+2). Just like in the previous examples, anytime you subtract a negative your answer will get larger.

The tan sarts off with a 1 soldier (-1) advantage

The tan sarts off with a 1 soldier (-1) advantage

3 of the tan soldiers (-3) are taken away

3 of the tan soldiers (-3) are taken away

the result of taking away 3 tan soldiers (-3) is a 2 soldier advantage for the green (+2)

the result of taking away 3 tan soldiers (-3) is a 2 soldier advantage for the green (+2)

IMPORTANT THING TO NOTICE!

In the above fight, three Tan soldiers (-3) are taken away resulting in just a 2 soldier advantage for the Green (+2). But, what if the Tan soldiers never left? We could create the same outcome by reinforcing the Green soldiers with three more soldiers (+3).

So a key thing to notice:

  • Taking away 3 Tan soldiers (subtracting a negative 3) has the same result as adding 3 Green soldiers (adding a positive 3). In both cases you get a two soldier advantage for the Green army (+2).

Other examples:

(-4) - (-7) = (+3) is the same as (-4) + (+7) = (+3)

(-15) - (-25) = (+10) is the same as (-15) + (+25) = (+10)

Negative - Positive = Negative

In our final conflict we have 5 tan soldiers (-5) and 2 green soldiers (+2) locked in an epic struggle. At this point the Tan soldiers have an advantage by 3 soldiers (-3). As the battle takes place, one of the Green soldiers (+1) leaves now creating a situation where there are now 4 more Tan soldiers (-4) than Green soldiers (5 Tan vs. 1 Green). So (-3) - (+1) = (-4)

This is another situation that kids really struggle with. Many will look at (-3) - (+1) and assume that it will equal (-2). Anytime you subtract a positive you will get a smaller answer, but students will often get confused and think that (-2) is smaller than (-4).

at the start of this battle the tan have the green outnumbered 5 to 2 for a 3 tan soldier advantage (-3).

at the start of this battle the tan have the green outnumbered 5 to 2 for a 3 tan soldier advantage (-3).

One of the green soldiers (+1) leaves

One of the green soldiers (+1) leaves

the result of taking away 1 green soldier (+1) is a 4 soldier advantage for the tan (-4)

the result of taking away 1 green soldier (+1) is a 4 soldier advantage for the tan (-4)

IMPORTANT THING TO NOTICE!

In the above fight, one Green soldier (+1) is taken away resulting in a 4 soldier advantage for the Tan (-4). But, what if the Green soldier never left? We could create the same outcome by reinforcing the Tan soldiers with one more soldier (-1).

So a key thing to notice:

  • Taking away 1 Green soldier (subtracting a positive 1) has the same result as adding 1 Tan soldier (adding a negative 1). In both cases you get a four soldier advantage for the Tan army (-4).

Other examples:

(-4) - (+3) = (-7) is the same as (-4) + (-3) = (-7)

(-11) - (+8) = (-19) is the same as (-11) + (-8) = (-19)

RULES FOR SUBTRACTION

In the subtraction problems above I have include a section called “IMPORTANT THING TO NOTICE!.” In each of these problems I showed how we could add the opposite of what we are subtracting and get the same answer. The is a key part of solving subtraction problems.

Convert Subtraction Problems to Addition problems then solve

  • Step 1: Change the subtraction sign into addition sign

  • Step 2: Change the sign of the second number

    • DO NOT change the sign of the first number!!

  • Step 3: Follow the rules for Addition

This will work on all subtraction problems. In a few situations like a positive minus a smaller positive (example: 5 - 3) you will probably not convert to an addition problem, but you could.

Examples of changing Subtraction problems to Addition:

(+6) - (+9) can be changed to (+6) + (-9) both equal (-3)

(+13) - (-7) can be changed to (+13) + (+7) both equal (+20)

(-8) - (+3) can be changed to (-8) + (-3) both equal (-11)

(-70) - (-9) can be changed to (-70) + (+9) both equal (-61)


Follow us(land of math) on:

  • YouTube

  • Pinterest

  • Instagram


Percentage of Mark Up and Mark Down with prices

2017-08-07+13.02.47+-+Copy.jpg

In this blog I break down finding percentage of Mark Ups and Mark Downs. The following is a short excerpt from my book the Ultimate Percentage Guide.

mumd2.PNG
mumd3.PNG
mumd4.PNG
mumd5.PNG
mumd6.PNG
mumd7.PNG
mumd8.PNG
mumd9.PNG

Get the Ultimate Guide to Percentages!!


This book is all about percentages (No shock there). It is divided into two parts: Percentage Guide and 30 Printable Percentage Puzzles/Games/Activities. The Guide portion of the book has notes and examples of different situations involving percentages (such as the modeling section above). There is a premium on using an algebraic approach to solving problems in this guide, but different methods are also used.

The following are the sections of this guide: Percentage History Percentage, Fraction, & Decimal Conversion Modeling Percentages Percentages as Ratios Finding the Percentage, Part or Whole amounts Comparing amounts Percentage of Change Percentage of Markup Percentages with Tax and Tips Percentage of Error Simple and Compound Interest Commissions

The Games/Activities/Puzzles section of the book is a combination of 30 different printable puzzles, games and activities. These are all puzzles that I have used with my classes. They are great for station work or just to supplement a percentage lesson

Percentages: How to find the Percent, Part and Whole Amount

Percentages: How to find the Percent, Part and Whole Amount

When solving these percentage problems, we will solve as a one step equation. The nice thing about this method is that you just memorize one thing instead of three. As students do these problems they will begin to notice short cuts they can use to solve problems quicker.

We want the students to discover these short cuts on their own. By doing this, students will have a much greater chance of retaining this information.

This will be hardest for parents (and even teachers) because we become so used to using the quicker short cuts. In the long term it will benefit the students with a greater depth of understanding of percentages

Read More

Modeling Percentages using Grids and Tape Diagrams

Modeling Percentages using Grids and Tape Diagrams

In this blog I’m writing about how I model percentages in my class. There are many parts of Mathematics that students will never use in their life once they graduate, but Percentages will be one of most used regardless of profession. Because of its importance, I like to take a little extra time to make sure that students have a deep understanding of this valuable skill.

Read More

How to convert decimals, fractions and percents

2017-08-14+23.21.31.jpg

In this blog, we will look at the relationship between Percentages, Fractions and Decimals. Each percentage has an equivalent fraction and decimal. One of the keys to working with percentages is the ability to master the relationship between these three. This will serve as your guide to decimal/fraction/percent nirvana.

Fractions to Decimals

When converting a fraction to a decimal, the thing to remember is that fractions are division problems. For example, most people know that the fraction 1/2 = .50 (or just .5). But why is it .50? Because when we divide 1 by 2 we get .50.

Other examples:

3/4 is 3 ÷ 4 which equals .75

1/8 is 1 ÷ 8 which equals .125

3/25 is 3 ÷ 25 which equals .12

Other examples:

.3 is read as three tenths so the fraction is 3/10 (does not simplify)

.35 is read as thirty-five hundredths so the fraction is 35/100, which simplifies to 7/20 (GCF= 5)

.125 is read as 125 thousandths, so the fraction is 125/1000, which simplifies to 1/8 (GCF = 125)*

*If you didn’t realize the GCF was 125 you could start by dividing (numerator and denominator) by a number that is common. For example 125/1000 ÷ 5 = 25/200 ÷ 5 = 5/40 ÷ 5 = 1/8.

What if you are not good at reading decimals? There is a pattern that you may notice as you convert a few decimals to fractions. You can write the number to the right of the decimal as your numerator (top number of the fraction). In the denominator, write the number “1” and the number of zeros equal to the amount of numbers to the right of the decimal.

If we use the decimal .13, we would write the number 13 on top of our fraction. On the bottom, we would write a “1” and two zeros because there are two numbers (the 1 & 3) to the right of the decimal. So .13 = 13/100

Decimals to Percentages

The thing to remember is that percentages are based on the number 100. To convert a decimal to a percentage we multiply by 100. So for example, take the decimal .21 and multiply that by 100. You get the answer 21. So... .21 = 21%

Other examples:

.75 x 100 = 75%

.8 x 100 = 80%

.03 x 100 = 3%

.125 x 100 = 12.5% (13% if rounded)

Students will begin to notice a pattern (some may call it a short cut). If you simply move the decimal two places to the right, you will get your percentage. This is something you want students to discover on their own (maybe with a little guidance).

Percentages to Decimals

Again, remember that percentages are based on the number 100. When we converted a decimal to a percentage, we multiplied the decimal by 100. Since we are now doing the opposite (percent to decimal), we are going to do the opposite of multiplying by 100 which is to divide by 100 (or multiply by 1/100). So, if we have 71%, we will divide the 71 by 100. The result is .71.

Other examples:

39% ÷ 100 = .39

12.5% ÷ 100 = .125

80% ÷ 100 = .8

5% ÷ 100 = .05

There is also a pattern with converting percentages to decimals. Simply move the decimal two places to the left to find the decimal equivalent of a percentage. What if you don’t see a decimal like in the example of 39% above? All whole numbers have a decimal (it is to the right of the number). So 39% has a decimal to the right of the “9.”

A decimal to the right of a whole number is similar to a positive sign on the number 32. It is not there, but it’s understood that it is there.

Percentages to Fractions (Actually percentage to decimal to fraction)

Converting percentages to fractions actually requires two steps. Fortunately these two steps are steps already covered. For example, if we want to write 81% as a fraction, we must first convert to the decimal .81. Next we are going to write the decimal as a fraction. We would read .81 as eighty-one hundredths. So we can write it as the fraction 81/100.

Other examples:

75% = .75 = 75/100 = 3/4

9% = .09 = 9/100

37.5% = .375 = 375/1000 = 3/8

Fractions to Percentages (Actually fraction to decimal to percentage)

Just like converting percentages to fractions, converting fractions to decimals also requires two steps. These are also steps already covered. For example, if we have 3/4 and want to write it as a percentage, we must first make it a decimal by dividing( 3 ÷ 4 = .75), then convert the decimal to a percentage by multiplying by 100 (.75 x 100 = 75%).

Other examples:

3/8 = 3÷8 = .375 x 100 = 37.5%

3/20 = 3 ÷ 20 = .15 x 100 = 15%

2/5 = 2 ÷ 5 = .4 x 100 = 40%


Need more information on Percentages?

Check out this ultimate guide to percentages on Amazon.

This book is all about percentages (No shock there). It is divided into two parts: Percentage Guide and 30 Printable Percentage Puzzles/Games/Activities. The Guide portion of the book has notes and examples of different situations involving percentages.

There is a premium on using an algebraic approach to solving problems in this guide, but different methods are also used. The following are the sections of this guide: Percentage History Percentage, Fraction, & Decimal Conversion Modeling Percentages Percentages as Ratios Finding the Percentage, Part or Whole amounts Comparing amounts Percentage of Change Percentage of Markup Percentages with Tax and Tips Percentage of Error Simple and Compound Interest Commissions.

The Games/Activities/Puzzles section of the book is a combination of 30 different printable puzzles, games and activities. These are all puzzles that I have used with my classes. They are great for station work or just to supplement to percentage lesson.

Area of Trapezoids made easy.

Area of Trapezoids made easy.

In the world of quadrilaterals, the formula to find area of Trapezoids is one of the most feared by middle school students. Perhaps it’s the use of parentheses. If you throw these bad boys into a problem it’s sure to create a certain level of anarchy. Possibly it’s the use of the numbers 1 and 2 written below and to the right of the two bases (b) in the parentheses.

Regardless of of the reason, the formula for Area of Trapezoids has caused many kids to surrender without so much as a fight.

The kicker is that the formula is not difficult to solve. In this blog we will look at a couple of the key terms, dissect the formula, give three examples of finding area and show you a three ways to model finding the area.

Read More

Area of Squares, Rectangles, Rhombuses, & Parallelograms

If you ever google: "How to find the area of a Square? Rectangle? Rhombus? or Parallelogram?" You are going to find a bunch of different answers.

For a Square, the formula given will be the Side Squared. The Rectangle's formula given is Length x Width. To find the area of a Rhombus you are given two different formulas: Base x Height or Diagonal #1 x Diagonal #2 divided by 2.  Finally, the Parallelogram's formula for area is Base x Height.

 
2018-06-19 22.36.12.jpg

All of these formulas are obviously correct, but you can make your life much simpler (or at least your kids) just using one simple formula:

Base x Height.

How is this even possible? The reason it's possible is because all four objects are Parallelograms. For a lot of students, it doesn't make sense how a Square, Rectangle and Rhombus  are also Parallelograms. Below are the rules for an object to qualify as a Parallelogram. 

  • Must have 4 sides

  • All 4 sides must be straight

  • Opposite sides must be the same length

  • Opposite sides must be parallel (so there are two sets of parallel sides)

  • Opposite angles must be the same

2018-07-21 11.28.02.jpg

To the right we can see that the Square, Rhombus, and Rectangle each have a total of four sides and each of the sides are straight lines.

The blue and orange highlighted sides are parallel with each other. So each object has a total of two sets of parallel sides.

The green arcs (angles) are opposite of each other. These two angles are the same. In the Square and Rectangle all the angles are 90 degrees, but in the Rhombus the two opposite green angles are both acute angles (less than 90 degrees).

Opposite black arcs (angles) are also the same. In the Rhombus the opposite blacks arcs are each obtuse angles.

Because all 4 shapes (square, rectangle, rhombus & parallelogram) are parallelograms we can just use BASE x HEIGHT to find the area of all four of these shapes.

Modeling Area of Parallelograms

Squares and Rectangles are the two easiest shapes to model. Grid paper is a very easy way to show this to students.

On both of these images not only can you see the base and height but you can visualize the individual squares that make up the rectangle and square. So when we say the area of the rectangle is 10 cm squared we can see 10 squares that have sides that are each 1 cm

2018-07-21 11.28.17.jpg
2018-07-21 11.28.26.jpg

Modeling with Cheez-its

An easy way to engage students is to use Cheez-its (or other square food items like Starburst) when modeling. It's a simple way to turn this into a hands on lesson and the kids like the payoff at the end.

Modeling a Rhombus or Parallelogram (non square/rectangle)

Modeling the area of a Rhombus or parallelogram is a bit harder with cheez-its (cutting up a cheez-its = pure mess). But it is fairly easy to model with grids. We can even turn the grids into a hands on lesson.

Below we have a Parallelogram (base of 8 with a height of 4) and cut it into two pieces by cutting on the height. We can rearrange the two sections to form a rectangle with a base of 8 and a height of 4 (same dimensions as before). By rearranging the Parallelogram we can visualize the 32 squares that make up the area

Below is another example of a parallelogram. We can take this parallelogram with a base of 10 and a height of 3 and cut into two parts by cutting on the height line. The two sections can be rearranged to form a rectangle with a base of 10 and a height of 3. By rearranging the Parallelogram we can visualize the 30 squares that make up the area.

We can model a Rhombus the exact same way by cutting into two parts (along the height) and then rearranging. 

Length x Width vs. Base x Height

Is Length x Height the same as Base x Height?

The answer is Yes (sort of). It all depends on your perspective. On the image below left we are looking down on the rectangle. So, we would refer to these dimensions as the length and the width.

On the image below right we have changed our perspective of the rectangle. We are now looking straight ahead, so our dimensions are now base and height.

So Base and Length and Height and Width are basically the same.

When looking down on a rectangle we can see length and width.

When looking down on a rectangle we can see length and width.

When the same rectangle is upright (like above) we can visualize the height and base.

When the same rectangle is upright (like above) we can visualize the height and base.

We hope you found this article helpful. You can follow us on:

Instagram, Pinterest, Twitter and YouTube at @landofmath


If you are looking for a more challenging activity for you kids check out "Finding Area of Unique Shapes" on Amazon.

This is a collection of 44 different shape combinations using rectangles, triangles, trapezoids, and circles.

The shapes progress in their difficulty.

You can check a video preview of this product below.


A dozen ways to help your kids with math this summer. (Stopping the Summer Slide)

Teachers have a Love/Hate relationship with Summer. Sure the time off to relax and spend time with their family is neat. But there is a dark cloud looming on the horizon. I'm talking of course of the Summer Slide.

The Summer Slide is students amazing ability to forget everything that they just learned the previous 9 months. As teachers, we know its coming yet we are still stupefied by its reappearance each year.

As a parent, what can you do to stop the Summer Slide (or a least slow it down) and give your child an edge this upcoming school year? Glad you asked!

You could make your child sit down and do math worksheets, but that would be just pure misery for everyone involved. Instead, I have included a dozen low stress, easy ways you can engage your child in discussions about math this summer (without your kids realizing you are working on math).

#1 - "How Much Longer" Situations

We have all been there. You taking a long trip (a vacation, visiting Aunt Doris or going to the store) and the kids keep asking you "How much longer?," or "When will we be there?" This is a great time to work on unit rates, reasoning and estimation skills.

Let's say you are driving to Nashville, TN and you have another 150 miles until you arrive. Of course the brats (your kids not the food item - even though that might make the story more interesting. Also, I'm sure your kids are actually quite lovely and a joy to be around on a long road trip.) in the back seat start asking "How much longer?"

Instead of just telling them how much longer (It's not going to keep them quite any way) you can give them your numbers and discuss how much longer they think it will be. This gives you  chance to guide them through the process of thinking mathematically.

For example, let's say you are traveling 60 miles per hour and you have 150 miles to travel. How much longer. The answer is 2 hour and 1/2 hours (or 2 hours 30 minutes). The goal is not to necessarily get the right answer (It would be nice), but instead get your child to think about how to use the numbers to get the answer.

There are many ways to get this answer. For example, maybe your child realizes that if you travel 60 miles in 1 hour, you would travel 120 in 2 hours and 180 miles in 3 hours. 180 miles is farther than you are actually going so the time will be between 2 and 3 hours. Another way could be that your kid realizes that 1 mile = 1 minute so the trip will take 150 minutes and 150 minutes is the same as 2 hours with another 30 minutes.

You can then build on this by asking how long it would take if you were traveling 80 miles per hour (not including the quality time spent with a local police officer discussing speeding laws in the state of Tennessee).

This doesn't need to be limited to just driving and miles per hour. Let's say you are at a baseball game (For example a Lehigh Valley Iron Pigs minor league game) this summer and the first 2 innings take a total of 40 minutes. At this rate how long will the game take to complete?

#2 - Finding the cost of gas on a trip

Let's say you are once again heading out on vacation, this time from San Francisco to Bend, Oregon (sounds like you are having a great summer so far!!).  The distance you need to travel is 480 miles each way. Your family has two vehicles to select from: a mini-van which gets 20 miles per gallon or a sedan which gets 30 miles per gallon. 

First, you could have your child figure out how many gallons you will need for each. The mini van will need 24 gallons of gas one way or 48 gallons of gas round trip. The sedan will need 16 gallons one way or 32 total gallons. The process of getting these numbers (without a calculator or paper) can be done a variety of ways. For the mini van you child might realize that 5 gallons = 100 miles or that for the sedan 10 gallons = 300 miles.

Once your child realizes that it takes an additional 16 gallons of gas for the round trip with a mini van they can then calculate the cost. For example, if the cost for a gallon of gas is $3 it means that it will cost the family an additional $48 in gas. You could then have a discussion about the value of paying the extra $48 but having the extra room and comfort of a mini van.

You can even use this to find a common multiple of the numbers 20 and 30 (which is 60). For example, you would need 3 gallons of gas to travel 60 miles with a mini van and 2 gallons of gas with a sedan.

#3 - A visit to the Land of Unit Rates (aka the Grocery Store)

It doesn't matter if it's Piggly Wiggly, Wegmans, or Krogers (or any of the other fine grocery chains) there is no better place to see unit rates in action than the grocery store. 

Just buy two 1 pound packages and use the $1 you saved to get a snickers bar!

As you travel through the store you will see unit rates all around you (Don't be afraid). Grocery stores will often have signs like "5 melons for $10" or "3 boxes of Mac and Cheese for $5". In most cases you DON'T need to buy 5 melons or 3 boxes of Mac and Cheese. These are just ways to manipulate you into buying more items than you planned on buying. You can just buy one Melon or Mac and Cheese. But what is the cost?

If you take the cost ($) and divide it by the number of items (melons for example) you will find the cost for each melon. So $10 divided by 5 = 2 or $2 per melon. What if you divided the number of items (melons) by the cost ($)? You would find how many melons you can get for $1. In this example you would get 0.5 melons per dollar (As a general rule grocery stores frown on you ripping apart a melon and telling the cashier you just need a dollars worth). Not only can you discuss with you child how to find the cost for each item, but you can talk about which form of unit rate makes sense. 

The Mac and Cheese example is a bit more difficult than the Melon example because when you divide the cost ($5) by the number of items (3 boxes) you don't get a whole number, but instead a decimal. This is a great time to use your estimation skills. Most kids will realize that the boxes cost for than a dollar each. A few for more will realize that if a box was $2 each that would be $6 total which is $1 to much. The cost is $1.67 per box. You can guide you child to under stand the cost is closer to $2 a box than $1 a box.

Grocery stores love to create situations where you think you are getting the best deal but they are really tricking you. Generally, if buy a larger container of food there is usually a bit of discount on the unit rate (less per ounce, pound or doughnut) BUT not always! Because stores have trained us to thing bigger is the better deal people will blindly get the larger package. To the left is an example from my local Krogers. Of the 7 or 8 people that bought strawberries while I was there, all but one (yes it was me) bought the 2 pound container of strawberries. You can point out examples of this as you meander through the store.

#4 - Let's Play Ball (Sports and Math)

If you have a child that is interested in sports you have a natural connection to math. It's impossible to watch a game on TV (or on your phone or computer) and not notice all the stats used. Just the basic act of watching a game with your child (in person or on TV) and discussing  the meaning of different stats (ERA, WAR, OBP, Batting average, slugging percentage, strike to ball ratio and so many more!!!) and how they are calculated can help a child think about math.

You can use these stats to make arguments about which player you think is the best. Often times when I attempt to talk to kids about who they think is the better player (could be football, basketball or any sport) their argument is that your guy "sucks." By understanding statistics the kids can make better arguments using data to support their opinion (This will also make the Language Arts teachers happy).

Want to amp it up a bit and still have fun? You can join a fantasy league (ESPN, Fan Duel, Draft Kings for example), play the board game Strat-O-Matic (they have games for almost every sport), or even play baseball video games. When you are in a fantasy league or playing games you can use math to justify your decisions.

#5 - Running a Lemonade Stand

A great ways for kids to make the connect to math and business is to let them run their own Lemonade stand. I let my kids have a lemonade stand a couple of times a year (once when we have a garage sale) and it's a lot of fun, but more importantly there are a ton of lessons to be learned from this activity.

I have my kids keep track of all their expenses (cups, ice, lemonade packets/lemons etc.). At the end of the lemonade sale we talk about Gross Profit, expenses and Net Profit. We also talk about the cost to make a cup of lemonade (cup, ice, lemonade) and our profit per cup.

To help their bottom line I buy all their unused inventory (extra cups and unused ice). For example, if they spent $8 on cups but only used 1/4 of the cups we will use $2 as their cost for cups. But, I will discuss how this would impact their business if I didn't do this.

#6 - Become Bob the Builder - build something... anything!

One of the best things a kid can do to help their overall math skills is to just build something. A table, workbench, ramp, dog house it doesn't matter. The act of making something will help with their geometric and measuring skills.

The nice thing about building items is that it's messy, hands on and requires problem solving skills (This is nice IF your kids clean up their mess!). Usually, the first time your kid attempts to build something it will be a random collection of materials that will be nothing like they were hoping to build. This is a great chance to give a little guidance/advice about angles, measurements and sketching out a design before starting.

Please: Do NOT just turn you kids loose with power tools (drills, band saws etc.) unsupervised. You can give your kids freedom, BUT you need to make sure they are safe!

#7 How far away is the lightning (or Fireworks)?

An easy way to sneak in a little math during the 4th of July or one of the many summer storms is to calculate the distance of the firework's explosion or the lightning bolt. This gives you a chance to talk about the difference between the speed of light vs. the speed of sound (You are welcome Science teachers).

The speed of light is so fast that virtually no time elapses from when an event happens to the time you see it. The speed of sound is much slower (375 yards/1125 feet per second). For estimation purposes you can figure about 400 yards per or 1,200 feet per second. A mile is 1760 yards or 5280 feet. 

When you see a lightning bolt (or firework) time the number of seconds until you hear the sound. Every second = about 400 yards. So 4 seconds is just a little less than a mile away and 5 seconds is just about a mile.

#8 - Raise a Garden

If you live in downtown Chicago this might be a bit harder, but for the rest of you this is another way to mix in a little math (and get some tasty produce!). One of the keys to a successful garden is the planning and layout. What are the dimensions of your garden? What ways could you layout your garden to maximize your space.  

You can track your garden expenses (seeds, plants, fertilizer, etc) and your total harvest (we have a little weight scale we use) though out the summer. If you want to amp up your garden math you can compare your expenses to the amount of money you would have spent. Was their any kind of savings? Even if it was more expensive you can talk about the health benefits of raising you own produce.

If you want to take this to another level you can have your kids set up a small farmers stand (or go to a farmers market) to sell their produce. Just like with the Lemonade Stand, this is a good way to teach some business skills along with math skills. (As a side note: I actually did this when I was in high school. As part of a project for Future Farmers of America (no I'm not a farmer) I raised cantaloupe for 3 summers. Each morning I would harvest the muskmelon, weigh and price each one. I would put my produce in a wheelbarrow and put out by the road with a couple of signs. I would play basketball while waiting for customers to arrive. I would usually sell out of produce by lunch. I made nearly $1,000 each summer!)

#9 - Lawn Mowing Business - the side hustle

There was a time when it was common for kids to make a little pocket money by mowing the neighbors yards.  Maybe it's because of all the lawn mowing services that have popped up over the years, but there seems to be fewer kids mowing lawns today. But, I would argue that the time has never been better for a teen to start a small neighborhood mowing business. Because kids are usually just using a push mower, their expenses are much less than the larger lawn mowing companies (along with not worrying about employee benefits, accountant cost, marketing, etc.). As a result, the kids can charge a lot less and still make a good profit.

Also, there are a lot of adults that remember mowing lawns when they were a kid and respect a kid today willing to work hard. And with less kids to compete with, the market is all yours.

What about the Math? Alright already!

First, your child is going to need to determine what they will charge. Is it going to be by the hour? A set rate per yard/lot? Based on square footage? Most of the lots in our neighborhood are roughly the same size so my son charges a flat rate per yard (double if the yard is actually 2 lots). How often are you going to mow? Could you charge a one time fee for the entire summer? What would you charge for this one time fee (remember: it should include a savings for the customer)?

Once you know the rate you will charge (which is you gross income) you can calculate your gross income per hour. For example, my son charges $15 dollars per yard. It takes him about 45 minutes to mow a yard. When he was calculating what he makes per hour he figured that he was making $5 for every 15 minutes. There are 4 groups of 15 minutes in an hour so he is making $20 per hour.

You can have your kids estimate their gas expenses by finding out how much gas is needed to mow a yard. For example, if it takes a gallon of gas (let's say it's $3 per gallon) to mow two yards that means it cost $1.50 in gas to mow a yard. You can find your net profit by taking you gross income and subtracting the expenses. If you want to take the to another level you can charge a rental fee for use of the mower and maybe include the cost to maintain the mower.

Other things you could do: What will you make per month from a customer? How much will you make if you mow 5 lawns during the summer. How many lawns would you need to mow to make a certain amount of money such as $1,000 or $5,000? How many hours would it take to make your goal?

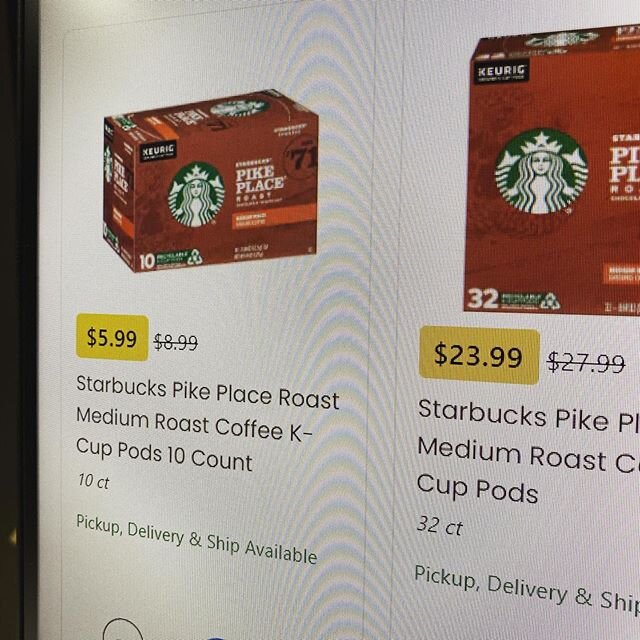
#10 - Estimating the Savings and Prices when Shopping

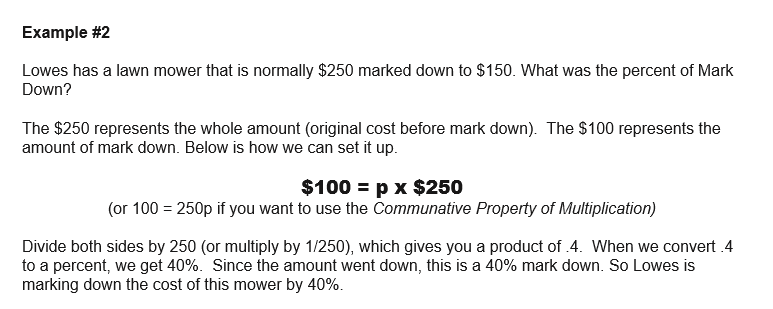
This is a great life long skill for kids to learn. This is easy to talk about in the flow of a conversation. You're shopping with you child and there is a sale! Let's say there is a 20% off sale on all lawn mowers at your local John Deere dealer. You are looking at a $2,000 mower (Apparently the lawn mowing business is working out quite well!). How much will you save? What is your cost? Many kids struggle with understanding how easy it is to find 10% of a number. In this example, 10% of $2,000 is $200. So, 20% savings would be $400 (double the 10% savings). If you are saving $400 that means that the sale price would be $1,600 (2,000 - 400 = 1,600). You can do this with any product (yes even toothpaste!).

You can then take this skill and apply this to calculating tips or taxes. For example, you are Red Lobster with your family. The bill is for $80 and you decide to leave a 15% tip. How much will you leave? If 10% = $8 then 5% = $4 so 15% = $12 tip (8 + 4 = 12).

#11 - Estimating the size of a crowd

You are at a concert, movie, baseball game or any place with a gathering of people. One simple thing to do is to estimate the size of the crowd. When you do this, don't just have your child randomly scream out a number. Have them explain how they got the number. For example, perhaps they noticed that their appears to be about 9 people in each row and since there is 100 rows the crowd is about 900 people. Maybe they count how many people are in a section and multiply that by the number of sections. You can also estimate what percent of the crowd is male or female or what percent of the crowd is rooting for a certain team.

You can do this with other things like how many Coins or M&Ms are in a jar. The correct answer is not important, the focus is on the process of trying to figure out the answer.  I remember reading about how one of the questions Google used to ask possible employees was "How long would it take to wash all the windows in Seattle?" Obviously, there is no way to determine exactly how long it would take. They are just trying to see how you would TRY to solve this problem.

#12 Being Bullish on the Stock Market

mad money.jpg

One of the best things you can do as a parent is to introduce your child to how money works and more specifically how the stock market works. You don't need to be a stock picking guru or understand how Options work. Just by demystifying the world of money can help your child achieve financial freedom as an adult.

But lets be honest, most of the information you will find about the stock market will be very dry and boring. You don't want to bore you kid to death (Unless this is some form of punishment for not cleaning up their room) so what can you do? Two words: Mad Money.

Mad Money is a television show hosted by Jim Cramer on CNBC at 6pm EST. The show is sort of a cross between the stock market and MTV (When is was still cool). It is a high energy, fast paced show with lots of flashy graphics. 

From a math stand point the show is packed with percentages, graphs/charts, ratios and all the different financial terms that you would expect. The show will have from time to time a chartologist to explain how they read and use different charts and graphs to make their stock picking decisions.  Mad Money will have on different business leaders to discuss the metrics that they feel are important to their businesses success.

It's a fun show to watch with your kids and an easy way to start discussions about investing and money.

Wrap Up

There you have it: A dozen different ways to keep your kids engaged with math during the summer without using a single worksheet. For me, I try not to get bogged down in working on basic skills (not that there is anything wrong with that) but instead try to focus on situations that require math as an adult.

If you are going to focus on your child's individual skills (which is a good thing) I would highly suggest finding games and puzzles (you can find some of these on our website) that make the experience a bit more fun for you kids.

Wishing you a happy and productive summer.


Cereal Box Project: A middle school math project

For over a decade the Cereal Box Project has  been a staple in our classroom. The idea is that a cereal box company is introducing a new cereal and they want a unique design for the cereal box to help gain extra attention.

Because the company wants something creative, a simple rectangular prism simply just won't do. The goal is for students to find ways to combine different shapes together to create this eye catching cereal box.

The following is a basic outline of the steps that we follow with this project. In addition, I'm including a few lessons from this years Cereal Box Project experience. 

Step 1 - Come up with an Idea

The idea? A light bulb of course. How do you make a light bulb? Make a Hendecagon of naturally.

The idea? A light bulb of course. How do you make a light bulb? Make a Hendecagon of naturally.

Like baseball? Really into Star Wars? Love doughnuts?

When coming up with an idea I find it helps student engagement when the students can use a topic that they are interested in. For example, if a student is really into baseball/softball they can make their cereal box look like a glove, bat, baseball field, home plate etc. This year a lot of my students are into the video game Fortnite. As a result, a large amount of cereal boxes has a strong Fortnite theme.


Step 2 - Reverse Engineer

As a middle school or elementary student there are certain limitations that we must work around. Many of these limitations are related to curves. For example, If you are trying to make a basketball (sphere), Football (prolate spheroid), or perhaps a megaphone (truncated cone) you are going to dive into a lot of math that is above middle school math level. 

Have the students think about what they want to create and how they can arrange different shapes to make this object. For me, the fun and challenging part of the project is to create these difficult shapes by using the students current knowledge and skills. 

Step 3 - Sketch out the idea

Put it down on paper. Draw the different shapes you are going to combine together to create your shape. Include dimensions.

Step 4 - Build a Prototype

I have our students build their prototype the same size as their actual project. We use scrap paper and masking tape to build these prototypes. A lot of potential pitfalls can be avoided during this step. 

Step 5 - Cutting out individual Pieces

When you begin to build your actual Cereal Box the first thing I like for students to do is cut out the individual sides. We build our cereal boxes out of card stock which is a real thick paper similar to poster board. The thicker paper is nice because it is more stable.


Step 6 - Decorate the individual Pieces

Before the students begin to assemble their projects they should first decorate.  Every year I will have a small collection of students that will tape their entire box together then decide to color and design it.  This almost always leads to frustration and crushed cereal boxes.

Step 7 - Assemble the Cereal Box

We use scotch tape on the final project. We try to tape as much on the inside as possible. As a general rule: The less tape you see the better the project will look.

Step 8 - Complete the required paperwork

We usually have students calculate the surface area and volume of their projects. In addition we also have students draw (to scale) Nets and 3D designs of the project. 

Lessons Learned from this years Cereal Box Projects

We had another successful year with our cereal box project. Many of the projects were creative and well done. Most of the students were fully engaged in the project. But we did have a couple areas that I need to clean up before next year.

The Curse of the Circle

We had a few students this year build cereal boxes that were either cylinders or had a circle as part of the design.  In both of these cases many students just randomly made a circle and just wrapped a long stretch of paper around the circle. There was no thought given to diameter, radius, or circumference. Needless to say, this made for a mess when it came time to make the cereal box the same as its prototype and with calculating surface area and volume.  

Struggles with Scissors and Straight lines

Normally I will take a day (or two) to show the students a few tips/tricks when making and cutting out the sides of their project.  Because of a time crunch this year, I thought I could save a little time and just give a brief talk and turn them lose. In the end this just created a lot more work for me and made it harder to help out as many students.


Interested in giving the Cereal Box Project a try?

This book will give you an in depth guide to how I use this project in my class.


45 Gift ideas for Math Teachers and Fans of Math

45 Gift ideas for Math Teachers and Fans of Math

So it's getting close to Christmas and your are still looking for gift ideas for that special Math teacher or math fanatic in your life. Don't fret, we got you covered with 45 different ideas for that special mathematical person in your life.

We have divided the gift ideas into 6 different categories: 1) Clothing & Accessories 2) For the Classroom 3) Books 4) Around the House 5) Math Fun 6) Productivity and 7) Stocking Stuffers

Read More

How I'm starting the school Year.

How I'm starting the school Year.

I used to open up the school year with some nice get to know you activities. For example, I might randomly partner students together and have them interview each other. After the students asked each other a few questions, they would introduce their partner to the rest of the class. This was always a nice way to ease into the school year and get to learn a bit about the kids.

As much as I (and the kids) enjoyed these opening day activities I always felt something was lacking. There seemed to be this disconnect with these activities and math. (Also, it seemed like every teacher in the building was doing some variation of this. So the students were doing this all day long. The novelty was lost by the time many got to me.)

Last year I tweaked how opened the school year. 

Read More

Huge fans of WeUseMath.org

There are tons of great math websites in the world of the internet. One that I really like is a nonprofit site called weusemath.org. BYU's mathematical department is the muscle behind this site. The site attempts to help answer the question: "When will I use math."

The site is a very user friendly site that's loaded with a bunch of terrific information. The site is broken down into a home page and 6 key sections: Blog, Careers, How to succeed in Math,  Did You Know, Math Resources, and a store.

BLOG

The BLOG is not the main strength of this site. The articles are very interesting, but the frequency is somewhat limited. In 2016 the site posted around 5 articles. If you are new to the site you have over 70 different BLOG post in the archives to pick from.

CAREERS

This is my favorite part of the site. This section looks at around 40 different careers (everything from Actuary to Urban Planner) that rely on math.

The first thing this section does is to highlight a person with this job. Second, the low, medium, & high salaries for the job are listed. Third, educational requirements for a degree in this field are discussed. Fourth, the site talks about when math is used with this particular job. Next, a list of potential employers is mentioned. Finally, this section will list any miscellaneous facts or citations.

HOW TO SUCCEED IN MATH

There is a list of 7 different things/tips that can help increase students chances for success.

DID YOU KNOW

Is divided into "Math in Real Life" and "Math Tidbits. The "Math in Real Life" part is a collection of nice articles about math. The "Tidbits" sections is random trivial facts about math.

MATH RESOURCES

This is my second favorite part of the website. This section of the site includes free resources, list of math competitions, curriculum ideas, links to different math sites and links to math puzzles.

STORE

The store is a collection of shirts for sale. 

OVERALL

The CAREERS and MATH RESOURCES sections make this a great go to site for teachers and parents. 

Famous Mathematicians

So you need to write a report on a famous mathematician. Maybe you want to drop some historical math knowledge on your math teacher. Perhaps you just want to learn about legends of the mathematical world. Below are links to 4 sites that should help you learn about these titans of the mathematical world.

Famous-mathematicians.com

Buzzle.com

Fabpedigree.com

Clark University

Gift ideas for Math teachers (The baker's dozen)

Gift ideas for Math teachers (The baker's dozen)

The struggle is Real

It's that time of the year. It is time to find a gift for people that you have no idea what they want. If the person you are looking for likes math we can help.  Below is a baker's dozen random math gift ideas. Think of these items as "affordable mathematical luxuries." 

Read More